So you need to ship a PC, but you’re unsure about the risks to the components.
What do you disassemble and pack separately? What’s safe to leave in? What about the motherboard?
We absolutely get it.
All these questions make perfect sense, and they also have clear answers if you’ve been shipping fragile items for as long as we have. Let’s simplify things.
This guide has three parts:
01
6 common FAQs: Assembly, boxing, carrier & costs, size limits, coverage, and packaging (with links for more info on each).
02
Detailed step-by-step guide to packing and shipping a PC.
03
Other considerations and FAQs.
6 FAQs about shipping PCs
Which components are safe to ship in the tower?
01
If there’s little risk of the component dislodging and damaging other parts, it might be OK to ship as-is.
For example, you’ll want to remove the drives, the PSU, the CPU coolers, and the graphics card. Other parts might be OK to ship within the tower.
For clarity, we’ve split all components into three groups:
01
Those that SHOULD be removed.
02
Those that MIGHT be removed.
03
Those that SHOULD NOT be removed.
Click here to read more about these groups and specific components.
Which box to choose?
02
Choose a box that meets the following criteria:
It’s heavy-duty—double or triple-walled.
It’s big enough for all parts and generous padding.
It’s not too big.
Click here for a step-by-step guide on choosing a box size.
How to choose a carrier for PC shipping
03
Choosing a carrier is about striking a balance between speed, reliability, coverage, and cost. We’ve compiled a detailed cost comparison for different PCs—click here to see it.
We’ve also analyzed alternatives, like local shippers and specialized pack-and-ship options for electronics. Click here to read more about those options.
Do you understand the size limits?
04
If you’re shipping multiple components in a big box, there’s a good chance your package will exceed the size limits.
In this scenario, one of two things will happen:
01
Additional charges for oversized items will apply.
02
The PC will be shipped as freight.
If you don’t fully understand what that means, click here to read more about the options.
Do you understand the coverage?
05
Declared value is your assessment of the PC’s worth—the number you declare on the shipping form. It’s the shipper’s maximum liability for damage or loss of your package.
It sounds similar to insurance, but it’s different because it’s subject to limitations.
If you’re not confident about the differences and you’re shipping a valuable PC, click here to read more about declared value and insurance options.
Do you understand the risks of improper packaging?
06
Did you know that UPS explicitly states they don’t cover damage or loss resulting from improper packaging? In fact, all major carriers have similar policies.
To learn more about packaging a PC, click here and read steps #2-10.
10 Steps to shipping a PC with minimal risk
Assess the key risks for your PC
01
Learning about the risks is your first step.
Shipped PC components might get damaged if:
01
The components shift inside the box and damage one another.
02
The box gives in under the weight of other parcels.
03
The parcel is dropped or falls, and the components are subjected to significant G forces when they hit a hard surface.
04
The parcel is exposed to moisture.
05
The parcel is exposed to a discharge of static electricity, which damages the most sensitive electronic parts—transistors, integrated circuits, oxide insulation. This is a rare scenario, but you should still keep it in mind when packing. More on it when we talk packing.
These scenarios will give you a solid foundation to pack your PC—and do it better than 95% of shippers.
Disassemble the “risky” components
02
Let’s be clear—there are very few fast rules for disassembling a PC for shipping. We’ll go over the few that exist.
We’ll also aim to balance the risk of complicated (dis)assemblies, because not everyone can align mounting brackets or apply thermal paste.
In other words, the risk of improper disassembly might be greater than the risk of damage in transit.
Let’s name that concept “the risk balance.”
So, which components should you remove and pack separately?
With the risk balance in mind, all components fall into three groups:
01
Those that SHOULD or MUST be removed and packed separately.
02
Those that MIGHT be removed depending on your and the recipient’s disassembly and reassembly skills.
03
Those that SHOULD NOT be removed.
You SHOULD remove the following components:

01
HDs and SSDs (hard and solid-state drives).
02
PSUs (Power Supply Units).
03
CPU coolers.
04
Graphic cards.
These 4 components add the most risk of shipping damage.
Some are on this list because they contain sensitive moving parts, like a hard drive. The rest are on the list because they are heavy and, if dislodged, can damage the slots or other parts.

You MIGHT remove the following:
01
CPU unit
02
RAM
03
Motherboard
04
Network cards
05
Other detachable parts—those that you and the recipient are comfortable (un)installing.
Number 5 might seem vague, but in our defense, we did say there are few fast rules for ALL PCs and ALL people.
You SHOULD NOT remove anything that:
01
Is firmly in place or light, with a low risk of falling out.
02
Is soldered on.
03
Would need expert reassembly (unless the recipient is an expert).
NOTE: A common question is, “Do I really need to remove parts if I package it well enough?” The answer is that you don’t have to, but the risk of shipping a PC “as-is” is MUCH greater than shipping it as bundled parts.
Get the padding and packing material
03
Armed with a good plan of what to pack separately, make a list of packing and padding supplies. Then, shop for anything you don’t have.
For reference—here’s what the list of packing materials might look like:
| Category | Items |
|---|---|
| General packing tools |
• Scissors • Utility knife or box cutter • Measuring tape • Packing tape dispenser |
| PC-specific packing tools |
• Screwdriver—Phillips and flathead • Foam cutter • Anti-static wrist strap and gloves (worth it if shipping PCs repeatedly) |
| General padding and packing material |
• Shipping box • Bubble-wrap • Air pillows • Packing paper • Foam sheets • Styrofoam panels • Corner protectors |
| PC-specific padding and packing material |
• Cable ties • Velcro straps • Isolation tape • Anti-static bags and foam • Bubble pouches • Anti-static plastic stretch wrap |
Secure other internal components
04
“Other components” includes anything that you’ve decided not to remove.
To secure the parts, follow these steps:
01
Bundle the cable with ties. If possible, affix them to the chassis’ walls without creating tension in the cable or the connectors.
02
Check that all parts you’re leaving in the chassis are firmly in their slots/bays and can’t be dislodged.
03
Check the screws and the brackets—tighten the loose ones.
04
Cover any exposed PCIe slots to protect them from dust and debris.
05
Add padding around the I/O ports.
06
Cover the sensitive parts with anti-static foam or covers.
07
Fill the chassis with padding to minimize the risk of damage even if a component does dislodge.
08
Use tape and straps to affix all case panels.
NOTE: Work through these steps with two goals in mind—minimize the risk of parts dislodging and lower the damage risk if they do.
Choose the right boxes
05
The box choice is crucial, so take your time and make sure you get it right. Let’s move in steps.
The correct box for shipping a PC will meet the following five criteria:
01
It’s sturdy and made for shipping—go for double or triple-walled boxes.
02
It’s big enough to fit all the parts.
03
It’s big enough to allow for padding between the packaged parts and on all box sides.
04
It’s not so big that it increases the risk of shifting.
05
It doesn’t add to the shipping cost needlessly.
How does that translate to real life?
Bear with us as we do some box-size math.
Let’s assume you’re shipping a mid-tower PC that is:
19 inches tall
18 inches long
8 inches wide
Let’s also assume you’ve identified 4 components that need separate packaging.
The assumed sizes of the removed components are:
01
Standard PSU (WxHxD, inches): 6 x 3.5 x 6
02
HDD (LxWxH, inches): 6 x 4 x 1
03
Dual-slot GPU (LxHxD, inches): 10 x 4.5 x 1.5
04
CPU cooler (LxWxH, inches): 3 x 5 x 6
NOTE: For that tower and those components, the minimum box size will be around 27 x 26 x 40 inches (LxWxH). That is a big box—to see how we got to that box size, read on.
How we got to the box size for the PC
Each separate component should be “hugged” into 2-3 inches of padding like anti-static foam. Let’s do the math with 2 inches of padding on all sides.
The box will need to fit five packaged bundles:
01
The tower, measuring 23 x 22 x 12 inches.
02
The PSU, measuring 10 x 7.5 x 10 inches.
03
The HDD, measuring 10 x 8 x 5 inches.
04
The GPU, measuring 14 x 8.5 x 5.5 inches.
05
The CPU cooler, measuring 7 x 9 x 10 inches.
With a bit of mix-and-match to optimize for efficient use of space—and cost control—we’ve reached the following layered configuration:

Layer 1. 1-inch thick Styrofoam to box size at the bottom.
Layer 2. The tower, laid horizontally.
Layer 3. 1-inch Styrofoam cutout.
Layer 4. GPU and PSU side by side.
Layer 5. Styrofoam cutout.
Layer 6. CPU and cooler side by side.
Layer 7. Styrofoam panel.
Final box size (minimum) as per our calculation: 27 x 26 x 40
The “problem” with the box size
The box size of our assumed PC goes over the upper limits for dimensional weight, which is how carriers calculate shipping costs based on volume (instead of the actual weight).
That can mean one of two things:
01
Special rates for oversized items will apply.
02
It might be shipped as freight (more on that in a minute).
Either way, the cost will be higher than that of standard shipping.
Size limits for shipping a PC as a parcel
| Size Limits | UPS | FedEx | USPS |
|---|---|---|---|
| Length and girth* combined (inches) | 165 | 165 (130 for Express) | 108 (130 for Retail Ground, still charged as oversized) |
| Length (inches) | 108 | 108 | * |
| Weight | 150 | 150 | 70 |
*Girth of packaged PC–(Width x 2) + (Height x 2)
What it all means for you: Size limits simplified
To ship your PC as a parcel (without surcharges), it must not:
01
Exceed any of the size limits from the table above.
02
Exceed the dimensional weight limit. You can do the math for your PC using our dimensional weight calculator here.
For reference, the upper size bracket that doesn’t exceed the dimensional weight limit is approximately 26 x 26 x 30 inches.
Shipping a PC as freight
If shipped as a parcel, your PC will travel with other smaller boxes.
If shipped as freight, the carrier will pack it onto a pallet or a separate container. It will still share a truck with other large and heavy packages, but the risk of contact damage is minimal.
If your PC exceeds the size limits, shipping it as freight might be more cost-efficient.

Wrap the PC tower: Anti-static film, foam, and bubble wrap
06
With the components separated and the inside of the tower filled with anti-static padding, follow these steps to wrap and secure it:
01
Protect the critical parts like the I/O ports on the backside. Use corner protectors and foam sheets to absorb potential impacts.
02
Wrap it in anti-static material. There are specialized anti-static cling films that won’t add volume, but you can also make do with a simple cotton cloth.
03
Add bubble wrap for protection. Choose large-bubble sheets if possible.
04
Secure the wrap. Use cling film and packing tape.
05
Optional—If you still have the original tower box and it doesn’t add much bulk, use it.
Pack the removed components and accessories
07
Pack all the components you’ve decided to remove from the tower (in step #2) and accessories like keyboards, monitors, mouses, etc.
Follow these steps/guidelines:
01
Wrap the sensitive parts in anti-static fiber and film.
02
Add foam or corner protectors.
03
Wrap it in bubble wrap or foam.
04
Aim for 2-3 inches of padding on all sides.
05
Use any original boxes that you still have.
06
Stabilize it all with packing tape.
Packing the monitor
If you still have the original packaging, pack the monitor in it. If you don’t, separate the panel from the base and affix a Styrofoam sheet to the screen.
Tape along all edges to make sure no loose screws get between the screen and the Styrofoam. Then, add a layer of bubble wrap or foam sheet and secure it.
NOTE: To protect from moisture, consider placing the packaged parts into waterproof zip lock bags. They’re available in different sizes on Amazon.
Pad and pack all PC parts
08
By this point in the process, you should have:
Wrapped and protected tower.
All components that you decided to package separately.
All accessories you’re sending along with the PC.
Main shipping box that fits it all.
To box it all up, work in these steps:
01
Plan the placement of parts—prioritize protection, stability, and efficient use of space.
02
Box the parts and components in “layers.”
03
Add padding between components that sit side-by-side (air pillows, chunks of packing paper, foam sheets).
04
Add protective horizontal layers between components. Styrofoam sheets are your friend here—they’re firm but flexible.
05
Try out different configurations to minimize shifting.
06
Fill any empty gaps and empty spaces with smaller pieces of padding.
NOTE: Imagine the worst-case scenario (like your package being dropped) and box the parts with that in mind. If the size allows for it, double-box for good measure.
Make the outer box slightly larger and add padding between it and the inner box (packing peanuts are useful for double-packing but are a mess to unpack).
Choose the shipping carrier for your packaged PC
09
Choosing a carrier for your PC will come down to the following:
01
Reputation and experience with shipping fragile items.
02
Speed vs. reliability.
03
Cost vs. safety.
04
Whether they offer specialized shipping for electronics.
05
Declared value and coverage.
06
Delivery options—standard and enhanced.
07
Size limits.
08
The balance between factors 1 through 7.
Costs of shipping a PC compared across three major shipping companies
NOTE: For the purposes of this guide, we’ll assume that you’re shipping a small PC measuring 18 x 13 x 12 inches and weighing 15 lbs.
Using that assumption, we will:
01
Calculate the cost of shipping at three reference distances. Short (New York to Atlantic City, approximately 130 miles), medium (New York to Chicago, approximately 800 miles), and long (New York to Los Angeles, approximately 2,450 miles).
02
Create a master cost & speed comparison table. To compare shipping costs and days in transit (for different distances and shipping methods, so you have them all in one place for a quick overview).
03
We’ll compare the minimum costs at base rates by carrier and distance.
04
We’ll compare the costs of premium shipping options, priority and expedited, by carrier and distance.
We’ll make the tables and graphs simple and self-explanatory.
Master cost and speed comparison of shipping a small PC
| Shipping Method | Atlantic City (~130 miles) |
Chicago (~800 miles) |
Los Angeles (~2450 miles) |
|---|---|---|---|
| UPS Ground ($) | $19.24 1 day |
$30.70 4 days |
$70.88 6 days |
| UPS Next Day Air® Early | $127.81 1 day |
$288.53 1 day |
$331.72 1 day |
| FedEx Ground | $21.05 1 day |
$38.70 2 days |
$69.33 6 days |
| FedEx First Overnight® | $144.10 1 day |
$356.12 1 day |
$399.21 1 day |
| USPS Ground Advantage | $19.00 1 day |
$28.55 1 day |
$55.05 4 days |
| USPS Priority Mail® | $21.85 1 day |
$37.75 1 day |
$84.60 1 day |
Minimal cost of shipping a PC: base rates compared
| Shipping Method | Cost to ship ~130 miles | Cost to ship ~800 miles | Cost to ship ~2450 miles |
|---|---|---|---|
| UPS Ground | $19.24 | $30.70 | $70.88 |
| FedEx Ground | $21.05 | $38.70 | $69.33 |
| USPS Ground Advantage | $19.00 | $28.55 | $55.05 |
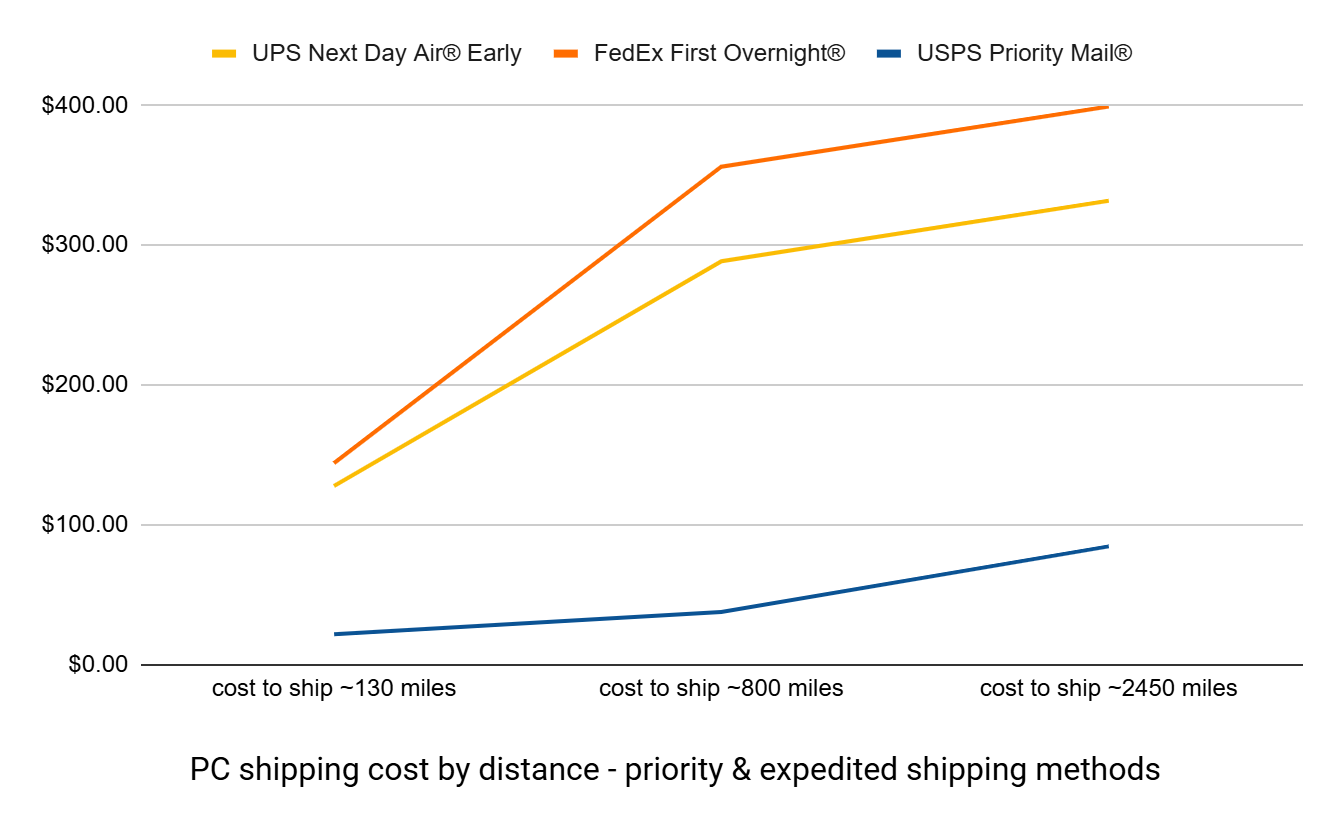
Cost comparison for priority & expedited PC shipping
| Shipping Method | Cost to ship ~130 miles | Cost to ship ~800 miles | Cost to ship ~2450 miles |
|---|---|---|---|
| UPS Next Day Air® Early | $127.81 | $288.53 | $331.72 |
| FedEx First Overnight® | $144.10 | $356.12 | $399.21 |
| USPS Priority Mail® | $21.85 | $37.75 | $84.60 |
Takeaways and conclusions
01
If you’re shipping a smaller PC and trying to save, UPS Ground and USPS Ground Advantage will be the most cost-effective option. The difference in shipping times will be significant.
02
If speed is a priority and you choose expedited or priority shipping, USPS is the most affordable. The difference in transit times is minimal—typically one day for all premium options.
DISCLAIMER: These calculations are for reference purposes only and are not quotes. For an accurate cost assessment, use the shippers’ calculators (linked below).
How to ship a PC with specialized shipping of electronics
If all the options get overwhelming, choose a carrier that offers specialized shipping services for electronics, like this option from UPS. It will cost more for a professional to do all the work, but if the alternative is a damaged PC, it’s worth it.
How to ship a PC with a local shipper
If the size exceeds the dimensional weight limit and the costs become too much, consider listing the job on a shipping aggregator like uShip. You list the job, receive offers, and compare the costs.
Local shippers might be the more cost-effective option for shorter distances.
NOTE: uShip does not vet drivers beyond making sure they’re licensed. Do your own due diligence and consider the shippers’ track record, especially with fragile items like PCs.
Seal and label the packaged PC with shipping in mind
10
To seal and label the packed PC, follow these guidelines:
Seal the box along all sides using heavy-duty adhesive tape (2-inch or wider).
Tape in an H-pattern and double-tape the critical parts, like the corners.
Add the packing slip with all the main information.
Add labels that inform the shippers of the contents, like fragile, handle with care: electronics, glass inside, and others that apply.
Add handling instructions like this side up, do not stack, keep dry, etc.
Communicate with the recipient. If they need it, add a label with unpacking instructions for a seamless unboxing experience.
PRO TIP: Set up tracking and share the tracking number with the recipient so you can both check the status of the shipped PC.
Other considerations of PC shipping
Declared value, limitations, and shipping insurance
Declared value is the maximum liability of the shipper for any damage or loss when shipping your PC.
It’s not insurance, and it’s subject to limitations.
In other words, if you declare that your gaming PC costs $5,000 and it gets damaged in transit, you don’t automatically get reimbursed for the full amount.
NOTE: Shipper’s policies typically state they’re not liable for loss or damage that’s a result of “improper packaging” and “data stored on media” (among other things, like Acts of God).
For you, that means four things:
01
Backing up all your data before shipping is a must.
02
Proper packaging is critical.
03
If you’re shipping an expensive PC, it’s wise to get third-party insurance.
04
Pay attention to the cost of declared value, because the fees add up.
Shipping process if sending internationally
International shipping of PCs adds steps to the process.
You might need to:
01
Secure additional documents. Commercial invoices, custom declaration forms, packing lists, proof of value, waybills, etc.
02
Get export permits.
03
Prepare a battery declaration form, if any components house lithium-ion batteries.
04
Prepare an end-of-use certificate. Inform the state and shipper how the electronics will be used (usually needed for advanced, military-grade electronics).
05
Check if restrictions apply. Some PCs might be subject to export control laws.
BOTTOM LINE: International PC shipping is significantly more complicated, and the details are beyond the scope of this guide. Contact your chosen carrier for more information.
FAQs about shipping PCs
Can I ship used computer parts?
Yes, you can ship used computer parts. The same principles of packing and padding for safety apply.
How much does it cost to ship a PC?
The cost of shipping a PC ranges from a few dozen to hundreds of dollars. The key factors are shipping distances, modes of transport, coverage, and size of the packaged PC.
Ship your PCs with peace of mind
If you’re shipping PCs in bulk, the right partner can change your life.
Red Stag is an award-winning 3PL provider with the know-how, experience, and robust infrastructure to take on ecommerce fulfillment jobs like this.
We understand what reliability means for a growing business. That’s why we offer iron-clad guarantees.

In other words: We lose it, we pay for it.
That gives you back your time and lets you focus on the business—promotion and growth.
If that sounds good, contact us today, and let’s talk about making your life easier.
